What is a Gui?
A Gui, or a Graphical User Interface, is a composition of 2D objects that are displayed on the screen in front of all 3D objects. They can be used to have more interactivity in your ROBLOX stages, such as with menus, buttons, and text boxes, or can even be used to make a special effect.
What types of GUIs are there?
To begin, you must note that there are two types of GUIs: ScreenGuis, and BillboardGuis. A ScreenGui lays over the screen and will render Gui components inside of it. A BillboardGui can affix itself to a part and render its Gui components in 3D space, but will always face the camera.
Note: the BillboardGui object is not yet documented by the ROBLOX developers, likely because it has a few bugs.
Why are these important?
Many games on ROBLOX haven't seen many GUIs, and this is because they require understanding some complex elements about them. Also, knowledge of scripting is almost necessary to use these objects effectively.
Learning how to use them, however, can allow the stage designer to display an immense amount of information on the screen, something that before GUIs was nearly impossible. This can be good for:
* High score charts
* Custom leaderboards
* RPG statistic screens
Guis can also be used to accept user input. Sometimes the stage designer wants to allow a user to pick and choose what will go on in the stage. This can be used in:
* Disaster scripts that allow users to vote for a certain disaster.
* Shops to give users the tools they want.
* Admin commands that aren't chatted.
So you can see GUIs have many uses. Some things that are common in stages now could even use GUIs to upgrade to be more advanced than the competition, so get a head start on them now.
GUIs look so complex. How can I use them?
Well, at first it may seem like a challenge to understand how to build them. I'll show you how you can use the properties to adjust GUIs to look good.
The necessary windows to create a Gui.
On the far left, you can see that the Tools button has an 'x' next to it. You need to make sure that your tools are open. This is vital to being able to make changes to your Gui and to view the current properties. Next, you should try and find your Explorer and Properties window. In the picture, you can see them on the right and the far right, respectively. If you can't find them, go to the file bar and find Tools, then click either Explorer or Properties, depending on what you need.
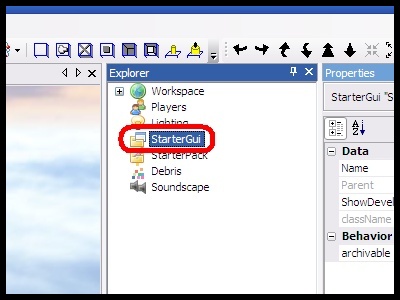
Make sure the StarterGui is selected.
After this, you'll have to insert a ScreenGui into StarterGui. To do this, select StarterGui.
Insert a ScreenGui
All you have at this point is a ScreenGui inside a StarterGui. One thing to remember about the
StarterGui is that anything inside of it will get replicated to each player's PlayerGui each time they spawn.
Make sure ShowDevelopmentGui is checked
Now we can get to begin building our Gui. Before we begin, we have to make sure that the Gui will be rendered in studio. To do this, click on StarterGui in the Explorer menu, then find the Properties menu. In there, you should find the property ShowDevelopmentGui. Make sure this is checked, otherwise you will not be able to see your Gui in construction.
Select a Frame and Press OK. The other objects circled in blue are Gui elements, but ones that we will not use now.
Let's insert our first object. In this case, we're going to use a Frame. A Frame is simply a rectangle with a solid colored interior. Select ScreenGui, then go to the Insert Object window, and find a frame.
On the far left you can see a frame, but I have circled all of the other Gui elements, such as a TextLabel or an ImageButton. For now, we will just work with Frames.
Press the plus ( ) signs to expand the Size property.
Now that you have inserted a Frame into your ScreenGui, you're probably wondering where it is. Well, as a default, the Frame is in the upper left corner, and is so small that it isn't visible. Now would be a good time to make it large enough to be seen. If you click on the Frame, you'll notice the property "Size" in the properties menu. Expand the property by hitting the + signs around it.
Now you'll see there are four numbers to modify the size. Size is broken down into X and Y, which are broken down into Scale and Offset. The X property changes the width of the object, and the Y property changes the height of the object. To modify these two dimensions, you have to change the Scale and the Offset. The Scale of the height is sort of like the percentage of the entire screen. If you use a scale of 1, the Frame will be as tall as the screen. If you use a scale of .5, the frame will be half as tall as the screen. Offset, on the other hand, is an absolute property. If you set offset to equal 50, the object will be 50 pixels tall, no matter how large the screen is. Got it?
If you want to read more on UDims, go here. http://wiki.roblox.com/index.php/UDim2

This is what your Gui should look like at this point.
For now, we can start with a Size of 0, 200, 0, 140. This means that the x-scale is 0, the x-offset is 200, the y-scale is 0, and the y-offset is 140. Here's what the Gui looks like right now.

On the left you can see how the Gui should look (the 50% marker is just a guide, and won't be on your screen). On the right is the properties that describe the Frame.
I'm sure at this point you're thinking that the color of the box is a bit boring, and the position of it is off. I'll first change the position. We're going to center it. To do this, we have to modify the position of the frame. Expand the Position property like you did with Size. Right now, we want to make the frame in the center of the screen, no matter how large or small the screen is. Start out by setting the Scale to .5 for both X and Y. At this point, you'll notice that the position is slightly to the right of the center, and below the center. This is because the top left of the frame is in the center, but it expands to the right and down when you set the Size. To correct this, we'll set the position of the Frame some more. Set the offset for x equal to -100, and the offset for y equal to -70. This is half of the size, making the frame directly in the center.
Click the property "BackgroundColor3", then click the ellipsis on the right and this dialog will open. Select your desired color and hit OK.
The final thing to change is the color of it. Find the property "BackgroundColor3" and click on the text that says "BackgroundColor3." Now you'll see a button in the value side of the properties menu that has an ellipsis. Click on that button, and a Color menu will open.
In this example, I chose a blue tone. You can choose whichever color you please.
Make sure Frame is selected, then insert a TextLabel into it.
Next we're going to insert a TextLabel into the Frame. This will make the TextLabel's Size and Position relative to the Frame's Size and Position. You should know how to insert a TextLabel by now, but in case you need instructions, you must select the Frame, go to Insert > Object... > TextLabel, and then hit OK.
Let's change the Size to be as wide as the frame is, and make it 20 pixels tall. Move to the properties menu, and expand Size if it isn't expanded already. Change the x-scale to 1, and the y-offset to 20. Here's what the label should look like.
At this point, you may wish to make a few changes to the Label, such as changing the color and the label. You can change the color in the same way you change the color of the frame. As an alternative to changing the color of the label, you can make the background part of a label transparent by finding the property BackgroundTransparency and setting it equal to 1. In my example, though, I'll just change the color.
Click the TextLabel, then find the "Text" property to change the caption.
Now we must change the label. We're going to make it say "Adjust your Max Health." To do this, select your TextLabel, and go to the Properties tab. Find the property "Text" and type in the following text: "Adjust your Max Health".
What the Gui should look like now.
At this point, your Gui should look something like this (colors may be different):
Now you're probably starting to get the hang of modifying your GUIs. Your next step is to add a TextBox to the Frame so you can get user input. We want to position it near the top of the frame, but underneath the label. If you center it, it will look a lot nicer. Be creative here! Some design tips:
* Center the TextBox. It looks nicer that way.
* Make the BackgroundColor3 a light color so that there's good contrast against the black text.
* Don't make the size much larger than is necessary.
* Change the text to better describe what the user has to type in the TextBox (the desired MaxHealth).

The properties I used for my TextBox.
To the left are the properties that I used for my TextBox.
Once you have the TextBox ready, you need to make a button for the user to click after inputting their desired Max Health. We are going to use an ImageButton for this. Click on the Frame, and go to Insert > Object... > ImageButton. Modify the Size and Position of this like you did with other objects.

The properties I used for my ImageButton
Now for the important part: putting an image on it. You have to make an image that will help people understand what pushing the button will do. In this case, I chose an image that says "Submit" on it. Type the text into the "Image" property. You can make a few aesthetical changes at this point if you want. On the left you can see my choice of properties.
Don't know how to find your asset Id?
Use these steps:
- Navigate to your Decal page.
- Subtract one (-1) from the Id. This should take you to a page that says [imgName], a Image by [userName]. If not, repeat this step until it does.
- Select everything after ".com/" and before "?id=", and remove it all. Replace that with the text "asset/".

Though the colors and proportions may be slightly different, your final Gui should look something like this.
Here is a rough estimate of what the final product should look like. You should have a frame, a label at the top, a TextBox, and an ImageButton. Your proportions may be different than mine.
That looks pretty good, and it will be added to everyone's PlayerGui when they spawn. Unfortunately, it doesn't do anything. It simply looks pretty. You can add Scripts to GUIs to make them work, or more specifically LocalScripts. LocalScripts can run inside the PlayerGui, making them ideal for use with GUIs. On top of that, they can access properties like AbsoluteSize, AbsolutePosition, and can get more arguments of events than normal Scripts can. If possible, use a LocalScript for all Gui usage.
In this case, we'll use a LocalScript to check when the ImageButton is pressed. We can start by inserting a LocalScript into the Frame. Double-click it to open up the source editing window.
Writing the Script for the Gui
Before we set out writing, we first have to analyze what the script needs to do. In this case, we need to wait for the user to click the Submit button. Once that happens, we have to set the user's MaxHealth equal to the number they typed in the box. Sounds easy enough? Let's begin.
Here we have the function. An ImageButton has the event "MouseButton1Down". This will fire when the user clicks on the button.
function onClicked()

end
script.Parent.ImageButton.MouseButton1Down:connect(onClicked)
Okay, now that we have that done, we are going to modify the function so it performs a task when called. In this case, we need to change Humanoid's maxHealth. At this point you need to stop and think what the hierarchy of ROBLOX objects is. The script's parent is a Frame. The Frame's parent is a ScreenGui. The ScreenGui's parent is a PlayerGui. The PlayerGui's parent is the player. That makes four parents.
local player=script.Parent.Parent.Parent.Parent
So now we have the player, but that is not what we need. The Humanoid is in the Character. Luckily for us, it's fairly easy to get the character from the player.
local character=player.Character
And after that, we simply need to get the Humanoid in the Character.
local humanoid=character:findFirstChild("Humanoid")
Before we move on, we have to know what value to change humanoid's MaxHealth to. In order to do this, we have to find the TextBox and change the health to the text.
local textBox=script.Parent.TextBox
Once you insert all of those variables into the script, it will look something like this.
function onClicked()

local player=script.Parent.Parent.Parent.Parent
local character=player.Character
local humanoid=character:findFirstChild("Humanoid")
local textBox=script.Parent.TextBox

end
script.Parent.ImageButton.MouseButton1Down:connect(onClicked)
Now what we need to do is to add a function to the script. In this case, we want to set the MaxHealth to equal the TextBox, so you'd write this.
local value=textBox.Text
humanoid.MaxHealth=value
But there's one problem with that. humanoid.MaxHealth is a number, and textBox.Text is a string. In order to convert that over to a number, you'd have to use the tostring() function.
local value=tostring(textBox.Text)
humanoid.MaxHealth=value
Now the script should work when you put it all together.
function onClicked()

local player=script.Parent.Parent.Parent.Parent
local character=player.Character
local humanoid=character:findFirstChild("Humanoid")
local textBox=script.Parent.TextBox

local value=tostring(textBox.Text)
humanoid.MaxHealth=value

end
script.Parent.ImageButton.MouseButton1Down:connect(onClicked)
As long as you type a number into the TextBox, the script will run fine. There is one problem, however. Users are able to type in more than just numbers, which can potentially mess up the script. Here's a simple way to prevent that from wrecking your script.
if value~=nil then
humanoid.MaxHealth=value
end
That bit of code can prevent cases where a non-numerical sequence is typed into the TextBox.
There are still a few more problems. People can type in negative numbers. This can make ROBLOX a bit buggy. Why don't we set up a check to prevent that, and while we're at it, prevent numbers from being too high.
if value<0 then value=0 end
if value>10000 then value=10000 end
The first checks if value is less than zero, and if so, it changes value to 0. The second checks if value is absurdly high, and if so, it will drop it down to 10000, no matter what the original number was. We are going to add this code in right above where we set the value. Here is our final code.
function onClicked()

local player=script.Parent.Parent.Parent.Parent
local character=player.Character
local humanoid=character:findFirstChild("Humanoid")
local textBox=script.Parent.TextBox

local value=tostring(textBox.Text)
if value~=nil then
  if value<0 then value=0 end
  if value>10000 then value=10000 end
  humanoid.MaxHealth=value
end
end
script.Parent.ImageButton.MouseButton1Down:connect(onClicked)
Want to learn some more?
There are many helpful reference pages on this wiki. Look at the class reference to find Gui objects, and read about some of the properties and events they have.